Fix: PowerShell does not wait before starting the next command

When creating a Powershell script and executing something in the middle of the script it does not wait until that process finishes and continues executing the script.

This can be a pain since you might have something executing after the script which depends on the executable you run.

So, when you are executing the file and you want Powershell to wait before continuing you must add the following for it to wait until it finishes.

&Myfile.exe | Out-Null

By adding the Out-Null after your script, it will wait until the MyFile.exe finishes before continuing executing.

This method can be used for the Start-Process as below

Start-Process MyFile.exe -NoNewWindow -Wait

Or you can use this to the Wait For Exit parameter

$proc = Start-Process -NoWindow
$proc.WaitForExit()

Fix: Page not found after activating WordPress plugin

I had issues when installing and activating a particular WordPress plugin called ‘ToolSet Types’.  After activating the plugin I will get a Page not found. I couldn’t access the wp-admin site but the blog remained active.

To get back the blog as it was one can browse the site using FTP and delete the particular plugin folder under /wp-content/plugins. This will make the wp-admin accessible again.

After some research I found out that the issue could be the memory setting on the WordPress wp-config.php file which is situated in the root WordPress folder. To fix this, open the file and add the below lines.

/** Memory Limit */
define('WP_MEMORY_LIMIT', '256M');
define( 'WP_MAX_MEMORY_LIMIT', '256M' );

In my case, after adding the above lines, refreshing the WordPress page I was able to install and activate the plugin.

Hope it helps with other plugins thou I encountered this issue only with the ToolSet Types plugin.

How to export mailboxes to PST in Exchange 2010

A new set of PST export cmdlets, introduced in Exchange 2010 SP1, make it easier for Exchange administrators to export primary and archive user mailboxes to Outlook Data Files (PST). Though not recommended for storing large amounts of enterprise data, Exchange administrators use the Outlook Data Files to back up individual user mailboxes in certain scenarios – such as an employee leaving the business. This can help meet regulatory compliance mandates without having to back up the entire database. Additionally, a PST file can serve as an easy destination for exporting user mailboxes from corrupt databases in order to later import them to a healthy one.

Which users are permitted to export mailboxes to PST?

All users, including administrators, need to be assigned Mailbox Import Export role in order to export mailboxes to PST. This can be done via the Exchange Management Shell. To assign Mailbox Import Export role to a user, run the following cmdlets in the Exchange Management Shell:

New-ManagementRoleAssignment –Role "Mailbox Import Export" –User <user name>

For example:

New-ManagementRoleAssignment –Role "Mailbox Import Export" –User Administrator

lepide_1
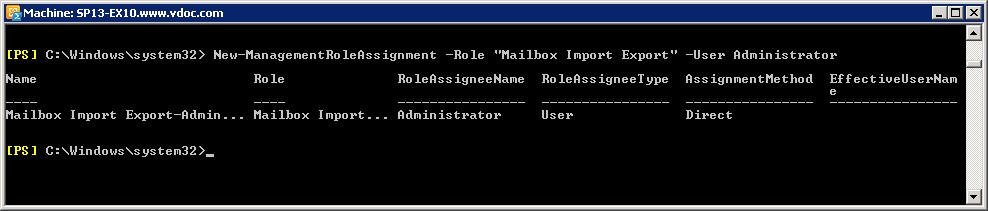
Figure 1.Assign Mailbox Import Export role to a user

To assign Mailbox Import Export Role to a security group, run the cmdlets:

New-ManagementRoleAssignment -Role "Mailbox Import Export" -SecurityGroup <Security group name>

For example:

New-ManagementRoleAssignment -Role "Mailbox Import Export" -SecurityGroup MailboxExportImportGroup

lepide_3
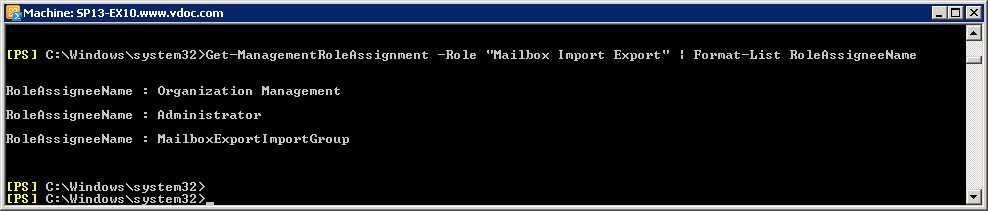
Figure 2. Assign Mailbox Import Export role to a security group

To check which users have the rights to export mailboxes, run:

Get-ManagementRoleAssignment -Role “Mailbox Import Export” | Format-List RoleAssigneeName

lepide_3Figure 3. Check for users who have the rights to export mailboxes

The location of destination PST

The destination PST file for the mailbox export needs to be in a shared folder that is accessible from Exchange. Share the destination PST folder and provide Read/Write permissions for the Exchange Trusted Subsystem over it.

How to export mailboxes to PST

Mailboxes are exported to PST by creating mailbox export requests. To create an export request for a user mailbox, run:

New-MailboxExportRequest -Mailbox <mailbox name> -FilePath <network share path to the target PST file>

lepide_4
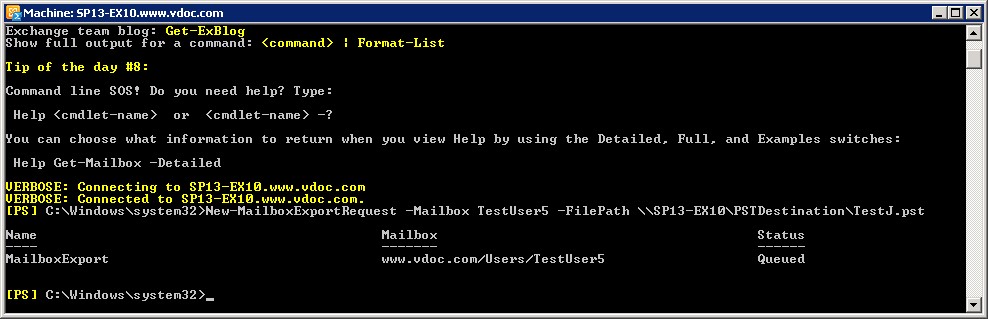
Figure 4. Export mailboxes to PST

Note: You can create as many requests as required; but a unique name need to be given for every request after the tenth one (after which Exchange will not generate unique names for requests). To name a request, use the parameter ‘–Name’.

To export an archive mailbox, use:

New-MailboxExportRequest -Mailbox -FilePath –IsArchive

Note: To include or exclude specified folders in the export, use –IncludeFolders or –ExcludeFolders parameter.

Getting the details

To get details about the mailbox request, run:

Get-MailboxExportRequest

lepide_5Figure 5. Get the details about mailbox export

A better way to export mailboxes to PST

Exporting mailboxes to PST using the Exchange Management Shell is not a quick process, and many IT teams find that it is not a viable method when faced with strict deadlines. Specialised Exchange recovery management solutions, like Lepide Exchange Recovery Manager, provide powerful PST export facilities and simplify the whole process of data recovery. Lepide Exchange Recovery Manager also works with all versions of Exchange to ensure maximum compatibility with your Exchange environment.

lepide_6
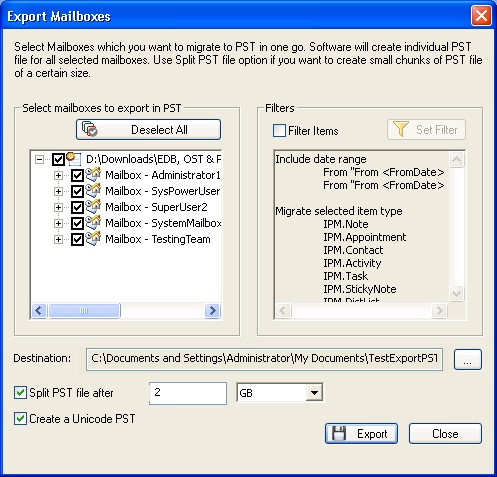
Figure 6. PST export options in Lepide Exchange Recovery Manager

The solution’s Export Mailboxes dialogue displays some of the important features included:

  • Select mailboxes to export in PST allows easy selection of one or more mailboxes for export
  • Filters provide granular filtering options that can be done according to a date range or item types
  • This solution allows users to browse for the destination, split the Outlook PST file and create Unicode PST

Getting user-friendly details about items, folders and mailboxes exported to PST

With Lepide Exchange Recovery Manager, getting item, folder, and mailbox details exported to PST is easy and the reports provided are simple to understand. The solution shows you information on the export operation, mailbox (es) exported, folders in the exported mailboxes and the messages in the exported mailboxes folders. The screenshot below shows a sample of the operation logs created when multiple mailboxes are exported to PST:

lepide_7
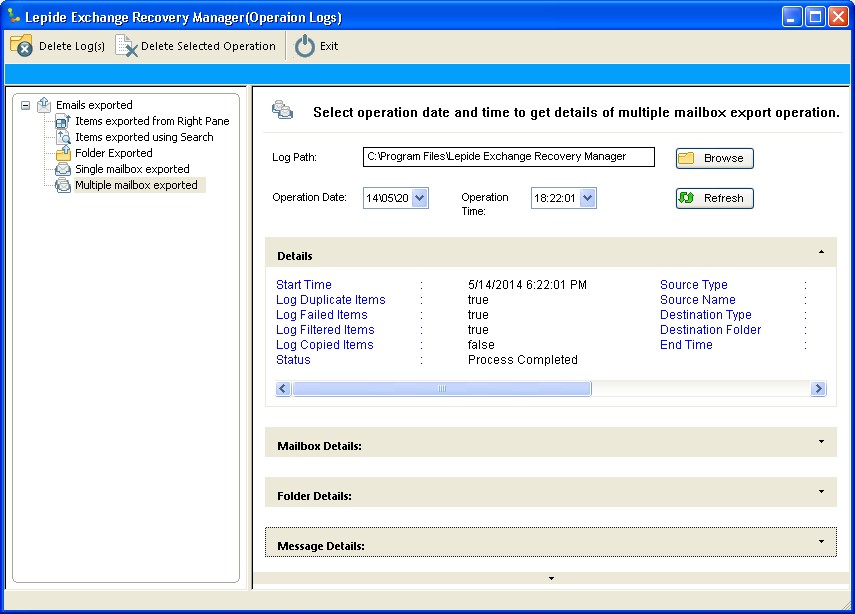
Figure 7. Details about the mailboxes exported to PST

Conclusion

Microsoft Exchange (from 2010 SP1 onwards), uses a new set of cmdlets to facilitate exporting mailboxes to PST. The user that performs this operation must be assigned Mailbox Import Export role and the destination PST folder must be accessible from Exchange. If you’re looking for an easier and quicker way to export mailboxes to PST, Lepide Exchange Recovery Manger is a powerful, cost-effective and user-friendly option.

How to: Setup Import Export role in Office 365

I went to upload the PST files on a tenant to use the Office 365 Import service by uploading the PST files using the AzCopy.exe. After I was done, I started the import and after 60 minutes I get a failed error. I made some research and then restarted the import, but now I noticed a message saying “Please add Mailbox Import Export role for use running import and check back in 60 minutes“.

To do this,

– Login in Office 365 portal
– Click on Exchange
– Click on Permissions
– Click on Admin Roles
– Add a new role with Mailbox Import Export Role
– Add the user you are using to import as part of the group

Screenshot below

office365_importexportrole

Fix: AzCopy.exe Could not finish the operation within specified timeout

When uploading files or PST files to Office 365 using AzCopy.exe, during the upload using Microsoft’s PST Import service you might have the frustrating error saying “The client could not finish the operation within specified timeout“. On the command prompt it will be seen as stuck on saying 0 files uploaded with a transfer speed of 0 KB/s. I literally spent hours trying to find out why my PST files do not upload to Office 365.

This can be fixed by lowering the concurrent operations with the import services. After looking at the option which is /NC option to either 2 or 1 depending on the internet connection upload speed. To be safe, in my case I have setup the NC as 1.

Here’s an example of how the command prompt will look like.

AzCopy.exe /source:\\My-Server\PST /dest:https://12345ab67cd89e0fg123h45.blob.core.windows.net/ingestiondata/Company/PST /destkey:jhdfasdfnasdnflasjkdfnjklsdanflasdfn/nfasdjkfnasdjklfnsjkladnfasjkldfnsdjklf== /S /V:d:\PST_Upload\upload.log /NC:1

Fix: Azure RemoteApp GPO login scripts not working

When setting up your template and publishing your apps, if you setup a Group Policy Object (GPO) for your users, this does not work. After some research and testing I found out that to solve the issue, you must do the following:

Add the Explorer application to the Published apps

Start by publishing the command line interface (cmd.exe). In the Publishingtab, select cmd, and then click Publish > Publish program using path.

Enter the name of the app and the path. For our purpose, use “File Explorer” as the name and “%SYSTEMDRIVE%\windows\explorer.exe” as the path.

In my case this worked, hope it does for you.

Fix: Azure AD Connect unexpected error on sign in

You setup the domain, verified and you are in the process of configuring the Azure AD Connect Tool, you will be asked to enter the username and password for the tool to connect to the Azure AD.

The connector immediately stops with an error at the first step under the Express/Custom settings page titled “Connect to Azure AD” with the below error.

Unable to validate credentials. An unexpected error has occurred

unexpectederror1

This error most probably will show because you are using a user which ends with @outlook.com and the connect tool will not work with an service-bound Outlook username. To fix this issue and work successfully simply create a new ‘Global Admin’ user on the AD which ends @yourdomain.

In my case this worked like a charm.


Fix: Windows Server Backup The process cannot access the file

When running Windows Server Backup to another location and you get the error “The process cannot access the file because it is being used by another process”.

Capture

To fix this you would need to look on the backup logs from the location %windir%\logs\windowsserverbackup.

In the error log file you will find

Error in deletion of [C:\System Volume Information\001.dat] while pruning the target VHD: Error [0x80070020] The process cannot access the file because it is being used by another process.

In my case, what I have done is that I deleted all the files in the target folder of the backup, re-run the backup and it worked.

Fix: Exchange error 0x800ccc6c – Verify that the mailbox exists and that the Exchange receive connectors are configured properly

When having especially SBS 2008 with the POP3 Connector to retrieve mail from an outside mailbox to your internal Exchange server, you may encounter the below error in the Event Viewer.

An error occurred while delivering mail to ‘mailbox@mydomain.com’ on the SMTP server ‘localhost’. The error code was 0x800ccc6c. Verify that the mailbox exists and that the Exchange receive connectors are configured properly.

Thou the error message is misleading, this problem can happen if the POP3 Protocol Errors meet the tolerance of the Exchange SMTP Receive connectors. Exchange will close an SMTP connection after a certain number of protocol errors. The default is 5.

To solve the issue, in my case I had to in increase the value of “MaxProtocolErrors” for the Exchange SMTP Receive connectors from Exchange Management Shell by using the below command.

Set-ReceiveConnector -identify “Name of Connector” -MaxProtocolErrors 999

After this, I have restarted the POP3 Connector retrieval of messages and it worked.

Fix: Office 365 This user’s on-premises mailbox has not been migrated to Exchange Online when using dirsync

“This user’s on-premises mailbox has not been migrated to Exchange Online. The Exchange Online mailbox will be available once migration is completed”

This only happens for users that have been synced using DirSync as they are mail enabled with on premises exchange. I do not however want to migrate mailboxes and would like to start a fresh.

To fix this, one should exclude the attribute ‘msExchMailboxGuid‘ on the Azure Active Directory Connect Tool (DirSync).

-Disable Synchronization from the Office 365 Portal
-Delete all synched users (marked as cloud now)
-Remove these mailboxes from the Office 365 Recycle Bin
-Edit the MIIS so the MSExchangeMailboxGUID does not sync
-Enable Sync again