Search and Restore file from SharePoint Online using PowerShell

When having SharePoint Online, one can easily recover items from the Recycle Bin, but unfortunately, there is no search facility for the Recycle Bin from the web interface. We can use PowerShell to easily search for the item.

To be able to connect, we need to install the new module, Open a PowerShell window and use the below to install the module.

Install-Module -Name PnP.PowerShell

If you would have an older version already installed, you need to use the below command to remove the old module, and then install the module as above.

Uninstall-Module -Name SharePointPnPPowerShellOnline -AllVersions -Force

To connect with the SharePoint Online site, we need to use the following command which will ask us to allow the script to communicate along with the Multi-Function Authentication (MFA).

Connect-PnPOnline -Url "Enter the SharePoint URL here" -Interactive

To extract the specified SharePoint Online Recycle Bin, you need to use the following command to output to the screen. Change the RowLimit to set the maximum results.

Get-PnPRecycleBinItem -RowLimit 50 | Select Title, ItemType, Size, ItemState, DirName, DeletedByName, DeletedDate | Format-table -AutoSize

To export the results to a CSV, you need to add the Export-CSV at the end as below

Get-PnPRecycleBinItem -RowLimit 50 | Select Title, ItemType, Size, ItemState, DirName, DeletedByName, DeletedDate | Export-Csv "C:\Temp\RecycleBin.csv" -NoTypeInformation

To restore a specific file, you cannot just specify the name, as you need to get the item information. We need to use the following commands

$itemtorestore=Get-PnPRecycleBinItem | ? -Property Title -EQ "filename of the deleted file"
Restore-PnpRecycleBinItem -Identity $itemtorestore -Force

This will restore the file to its original location.

Swish

Fix: Rule Not clustered or the cluster service is up and online error during update of standalone SQL server

When updating your SQL server (Standalone) with a Cumulative Update (CU) you might check the error in the Rule Check Result.

Rule "Not clustered or the cluster service is up and online." failed.

The machine is clustered, but the cluster is not online or cannot be access from one of its nodes. To continue determine why the cluster is not online and rerun setup instead of rerunning the rule since the rule can no longer detect a cluster environment correctly.

This is a very strange message, especially since the SQL server is a stand alone server and there is no cluster. After a restart of the server and re-trying the update, the problems still persists.

After a lot of investigation, this issue is nothing related to SQL, but WMI. This can be verified by opening the WMI Management using the command WMIMGMT.MSC, right-click on WMI Control (Local) and click on Properties.

If your entries show Invalid Class, as the above screenshot, we need to re-compile the MOF files using the following command from a command prompt as Administrator.

mofcomp C:\Windows\System32\WBEM\cimwin32.mof

The result should be as below

After this, if you rerun the WMIMGMT.MSC and the same process, the WMI should look like this.

You can now re-run the SQL update and it will update with no issues, thus solving the problem permanently.

Fix: Cannot install July updates KB5004298 and KB5004285

You may have an issue with installing the KB5004298 and KB5004285 on your system. At first, the updates would install successfully, but when you reboot you will get an error saying “Failure configuring Windows Updates. Reverting Changes”

There will not be any error on your Windows machine, only a generic message that the update failed with the error message Code 800F0922 in the Windows Update History.

The error is due to an Acrobat Flash removal issue and the update will fail since it couldn’t find the folders. To resolve the issue, you need to create the following folders with the same case.

C:\Windows\System32\Macromed\Flash
C:\Windows\SysWOW64\Macromed\Flash

Once the above empty folders are created, simply re-run the updates and after a restart, they will be successful. Voila!


Stellar Converter for EDB – Best Software to convert EDB file to PST

Today, we are going to explore an EDB to PST converter application, called Stellar Converter for EDB. This application promises safe and effective conversion from any EDB file of any version of Exchange Server – from 2007 to 2019, to PST and other formats. The application also exports EDB data directly to live Exchange Servers and Office 365 tenants. Let us take a tour of Stellar Converter for EDB and see if this application does the job as it promises.

So, first things first. Why do we need an application like Stellar Converter for EDB when we can export mailboxes, with no issues, from the Exchange Server directly with the Exchange Admin Center (EAC) or by using PowerShell?

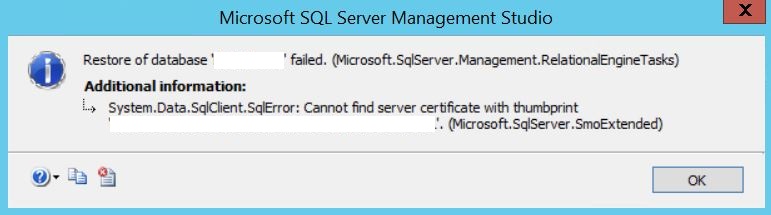
For the native tools to work, you need to have your Exchange Server online and the mailbox database mounted to be able to export. If this is not the case, apart from having your users banging on the IT door to access their mails, you will not be able to export the emails. This is where Stellar Converter for EDB comes into play.

Installation

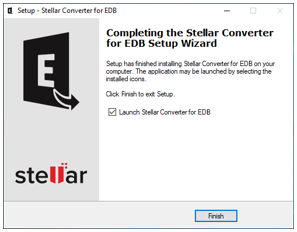
Installation of the software was easy, since the installation file was no bigger than 30 MB. It can be installed on any machine, not required to be installed on the Exchange Server. In fact, I was able to install and use it on a Windows 10 machine with no issues.

Opening an EDB File

EDB to PST Converter software offers two options to open an Exchange mailbox database – online Exchange database and offline copy. So, what is an offline database?

  • It could be a database that is not mounted due to licenses overuse in the Exchange Server Standard edition, where you have more than five mailbox databases.
  • An EDB file restored from an old Exchange Server.
  • An EDB from a failed server which is failing to boot, either from faulty hardware or software.

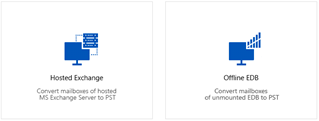
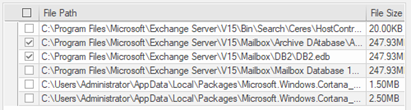
If you choose the Hosted Exchange option, you need to enter the credentials of the user’s mailbox or the user who has access to all the mailboxes. If you do not know the location of the offline EDB files, you can always run the find function to find them automatically after selecting the drive.

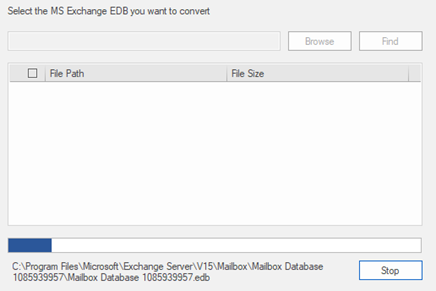
Once found, you can select the EDB file for scanning. You can also select more than one to export from.

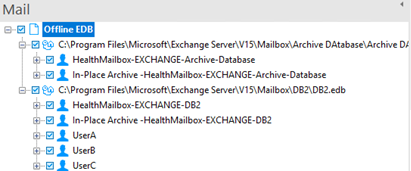
Once this is complete, the database will be quickly scanned. After a few minutes, depending on the size of the databases, it will display them on the interface. It delivers on the aspect of opening several EDB files at a time, including the archive mailboxes and the system mailboxes as well.

The Interface

Looking at the interface briefly, I really appreciate the fact that most of the functionality is visible on the same screen, with no complications or having several buttons on the screen. The interface is very clean and minimalist, but not lacking any functionality.

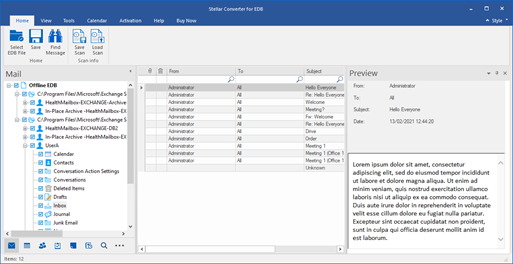
The interface resembles the one of Outlook with the folder structure on the left pane and different sections at the bottom for mail, calendar, contacts, task, etc., which is also a great way to browse and explore an EDB file. In the middle pane, you’ll see the list of items. I noticed that the search option is in-built in the pane. For example, you can search for a particular subject just by starting to type in the row of the search.

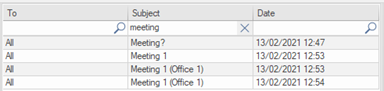
As soon as you start typing, the search results will immediately show up. You can also have multiple-column search. On the right-hand side, you will have the preview pane which shows HTML emails in full, including attachments. Two thumbs up for functionality, experience, and simplicity.

Functionality

Apart from having the in-line search in your folders, you can still have the views of the contacts, calendar, and other mailbox objects. You also have the advanced search option which gives more criteria to search with.

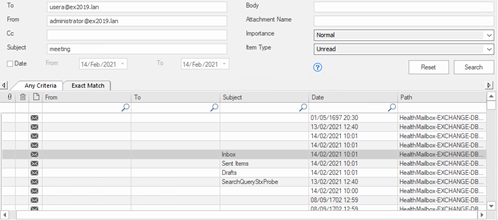
Apart from the advanced search, within the pane, you can also do an in-line search from the search results to drill down your results.

If the EDB file takes a while to scan for the first time, you can always save the scan so that you will not have to re-scan your databases each time you open the files with Stellar Converter for EDB.

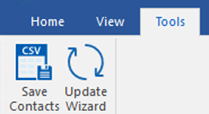
From the tools, you can also export only the contacts to CSV of the selected mailboxes.

Export Capabilities

The application is said to export to various file formats, Exchange Server, Office 365, and Public Folders. After testing it out, it does not disappoint at all.

Once you click on save, you will be asked what export you would like. Apart from the file saving options – PST, MSG, EML, HTML, RTF and PDF, the options that caught my eye were the Export to Exchange Sever, Office 365, and Public Folders.

Let us say that you have restored an EDB file from a decommissioned server and want to export some mailboxes to PST and then import them into the new Exchange Server. You can easily use Stellar Converter for EDB to export the mailboxes directly to the Exchange Server with auto-mapping of users. You can also use the software in a migration where the two Exchange Servers cannot co-exist. You can even use it to migrate your on-premises Exchange Server to Office 365. There is a new option that allows you to export directly to a Public Folder. This option is very useful as you might have old mailboxes that you would need and import them into a particular Public Folder.

Verdict

I was surprised how the application fulfilled all it is promises. The application works flawlessly with all the functionalities being clean and easy. It offers all the functionalities that one would need – opening EDB file, browse through it with a known interface, search functionality, and export to various file formats and applications, like direct import into live Exchange Servers, Office 365 tenant, and Public Folders. It is an application worth having for any Exchange Administrator.


Fix: Missing Sysvol and Netlogon after domain controller promotion

Many cases I found an issue with the newly promoted domain controller is missing the SYSVOL and NETLOGON shares. Most of the cases it would also be a new domain controller for a new forest. In most cases, you would need to update the flag as below.

Open Regedit
Browse to HKEY_LOCAL_MACHINE\SYSTEM\CurrentControlSet\Services\Netlogon\Parameters
Set SysVolReady from 0 to 1
Close Regedit

This will create the SYSVOL share. If the NETLOGON share is not created you would need to create the folder scripts in C:\Windows\SYSVOL\domain\. When this is done, restart the NETLOGON service.

This is the easy part. In some cases, although the NETLOGON and SYSVOL shares are working, no group policies or scripts are being replicated using the DFS or DFRS.

We can verify the replication by running the following command.

For /f %i IN ('dsquery server -o rdn') do @echo %i && @wmic /node:"%i" /namespace:\\root\microsoftdfs path dfsrreplicatedfolderinfo WHERE replicatedfoldername='SYSVOL share' get replicationgroupname,replicatedfoldername,state

The states should translate as below

0 = Uninitialized
1 = Initialized
2 = Initial Sync
3 = Auto Recovery
4 = Normal
5 = In Error

In my case, I have noticed that the newly promoted server was showing 2 and the main domain controller was showing “No Instance(s) Available” which is quite strange.

Here you would need to look into the original Active Directory server for any problems and you would see a warning on the DFS Replication under Applications with Event ID 2213 as below.

It says that the DFS Replication service stopped replication on volume C:. This occurs when a DFSR JET database is not shut down cleanly and Auto Recovery is disabled.

What we need to do here is from the event viewer take note of the volumeGUID and run the below command and replacing GUID-NUMBER with your GUID.

wmic /namespace:\\root\microsoftdfs path dfsrVolumeConfig where volumeGuid="GUID-NUMBER" call ResumeReplication

This will restart the replication and recreate the database. This can be seen with an event with ID 2214 saying The DFS Replication service successfully recovered from an unexpected shutdown on volume C:.This can occur if the service terminated abnormally (due to a power loss, for example) or an error occurred on the volume. No user action is required.

If you run the command to see the state of the replication you will see that the servers are all showing state 4 as below and the both Sysvol and Netlogon will be replicated.

Fix: SharePoint error Cannot generate SSPI context for SQL Server

When having a SharePoint setup you might get the following error in your event viewer.

Event ID 5586 – Unknown SQL Exception 0 occurred. Additional error information from SQL Server is included below. The target principal name is incorrect.  Cannot generate SSPI context.

The main culprit could be the lack of an SPN record. To do this, log into your SQL server as a domain administrator. Launch a command prompt as Administrator and type the following.

setspn -L Domain\UserName

Note: Replace Domain\UserName with the SharePoint user you are using for the services. If you are getting the ‘Cannot generate SSPI context’ you should not see an entry for the SQL server in the command we just executed i.e. you SharePoint farm service user.  Run the command below to add the SPN record for the SQL server

setspn -A MSSQLSvc/SQLServerName.Domain.com:1433 Domain\UserName

Note: Replace SQLServerName.Domain.com with the full FQDN name of your SQL Server. If you are using SQL AlwaysOn Availability or cluster, please enter the full FQDN of the SQL listener. Also change the Domain\Username with the SharePoint service user.

Once executed, run the first command we executed and make sure that you have the SQL SPN record for the username.

This should fix the Event ID 5586

Fix: Blank page when loading ECP on Exchange 2013

On Exchange 2013 you might encounter a blank page after the login page of the Exchange ECP portal. The Login page will load without issues but when you login successfully, an empty blank page loads.

This could be due to the Default Website and Exchange Back End website do not have the same certificate. Sometimes this happens when you either change the certificate or renew it.

To solve this, open the Internet Information Services (IIS) Manager
Expand Sites
Right click on Default Website and click on Edit Bindings

From the list click on the https with the port 443 cnad click the edit button and confirm that you have the new cerficate selected and take note of it.

Right click on Exchange Back End site and click on Edit Bindings

From the list click on the https with the port 444 and click the edit button. Here make sure that you have the same certificate assigned and click close. In my case the certificate assigned was empty as the certificate was deleted.

Run IISReset from the command prompt as Admin

The ECP will now load.

How To: Enable Remote Desktop Services RDP remotely

To enable Remote Desktop Services (RDP) you might need to either use Group Policies or by physical access on the computer or server. Remotely you would need to use command line with PSTools which can be downloaded here.

Once downloaded and extracted type in the below

psexec.exe \\ reg add “HKEY_LOCAL_MACHINE\SYSTEM\CurrentControlSet\Control\Terminal Server” /v fDenyTSConnections /t REG_DWORD /d 0 /f

psexec.exe \\ netsh firewall set service RemoteDesktop enable

How To: Create local users or admins remotely

You might encounter the need to create a local user, add it to the local admins remotely. Being if the user cannot log in or the local admin is lost.

For the purpose you need to use PSTools which can be downloaded from here.

Once downloaded open a command prompt as Administrator from the server or a machine logged in with a domain administrator and type

PSEXEC \\computername NET USER localadmin <pass> /add

PSEXEC \\computername NET LOCALGROUP Administrators localadmin /ADD

localadmin being the username you wish to use and the <pass> is the user’s password.

Fix: Cannot find server certificate with thumbprint while restoring SQL database

When restoring a database you might get the below error.

System.Data.SqlClient.SQLError: Cannot find server certificate with thumbprint

This is because the database was encrypted with Transparent Data Encryption (TDE) and you will not be able to restore it until you get the Certificate, the Private key and the password from the supplier of the database.

After you collect the required items above, open a new SQL query as the server admin on the database master.

First we need to create the master cerificate on the server by using

USE master
GO
CREATE MASTER KEY ENCRYPTION BY PASSWORD = '<MyComplexPassword>'
GO

Now that the master certificate has been installed you will need to install the certificate provided by the owner of the database

CREATE CERTIFICATE MyServerCert
FROM FILE = 'C:\TDECert\Cert.cer'
WITH PRIVATE KEY (FILE = 'C:\TDECert\key.pvk',
DECRYPTION BY PASSWORD = '<PasswordProvidedByTheSupplier>');

Once this is done and executed you will be allowed to restore the database.